Most people set up a single monitor arm in the wrong order. They buy the arm, clamp it to a desk they never measured, hang the screen, and then spend three months watching it drift south a quarter inch at a time. After 200 plus desk builds for clients around Raleigh, I can tell you the arm is rarely the problem. The order of operations is.
The sequence that works is boring and it almost never fails: measure the desk, weigh the monitor, confirm the VESA pattern, mount the base, hang the screen, then tune the gas spring and the tilt joint before you sit down. Everything below is that sequence with the details filled in.
Why you should trust me
I am an IT infrastructure engineer, 13 years in, and I have spent the last five running a side business building home offices. Desks assembled, cable-managed, monitor-armed, handed back to the client. Every arm I recommend goes through the same gauntlet I put client hardware through: a 90-day daily-use trial, a wobble test with a 27-inch panel pushed to full extension, and a cable management audit at day 30 and day 90. I keep a torque wrench in my desk drawer because "finger tight" is a claim, not a specification. If an arm sags after the return window closes, I want to find out on my desk, not on a client's.
How I picked and how I tested
This is not a "best arm ever" piece. It is a how-to with two specific arms attached, because you need something to point at while you follow the steps.
The criteria are the four things that decide whether an arm is still level in year three:
- Gas spring behavior at full extension. Not at the comfortable half-extended position where every arm looks fine. At full reach, with the panel hanging out over the desk, does the head hold height or creep down?
- Tilt adjustment without tools. If setting tilt means digging out an Allen wrench, you will set it once and never touch it again. Then your neck pays for it.
- Base fit. Clamp range, grommet compatibility, and whether the base clears a cable tray or a desk apron.
- Cable routing. Channels and clips, not a velcro strip and a prayer.
Both arms below are single-arm desk mounts aimed at the same job, so the choice comes down to your screen size and your desk edge.
Two single monitor arms worth clamping to a desk
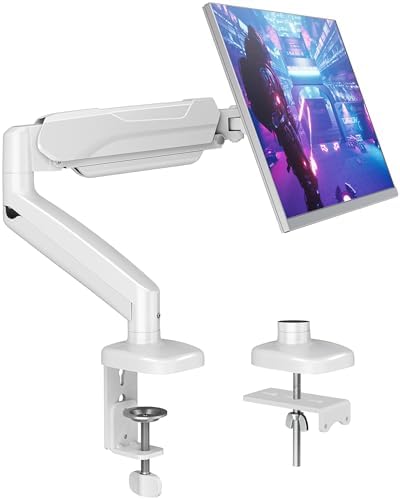
Budget pick: MOUNTUP Single Monitor Desk Mount Holds Screen up to 32 inch, Height Adjustable Monitor Arm, Full Motion Computer Monitors Stand with Clamp/Grommet Base, VESA Mounts Fit 4.4-19.8lbs Computer, Black
 Visit on Amazon →
The reason this one leads is the base. It ships with both a clamp and a grommet mount in the box, and that flexibility solves the most common problem I run into: a desk with a beveled or rounded front edge where a C-clamp simply will not bite. If the clamp does not fit, you go through the grommet, and you are not shopping for a different arm on a Sunday night.
The stated weight range is 4.4 to 19.8 pounds and the stated screen ceiling is 32 inches. That covers a 24-inch office panel, a 27-inch daily driver, and most 32-inch screens. Full motion means the arm articulates at the base, the elbow, and the head, so you get height, reach, tilt, swivel, and rotation.
Flaws but not dealbreakers: The top of that weight range is a ceiling, not a target. A 32-inch panel with a chunky VESA adapter plate eats the headroom fast, so weigh your monitor without its stand before you order. The grommet route also means committing to a hole in your desk, so measure the hole and the clearance underneath before the drill comes out.
Who it is for: anyone with a 24 to 32 inch panel, a desk edge that may or may not accept a clamp, and no interest in drilling a hole until they have to.
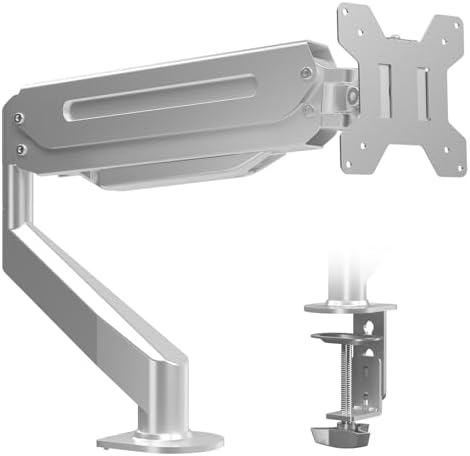
Upgrade pick: Suptek Single Monitor Arm Fully Adjustable for 17-34-35 Inch Screens
 Visit on Amazon →
The Suptek is the one in this pair that claims coverage up to 34 and 35 inch screens, which is the number that matters if you are running an ultrawide. Wide panels put leverage on the head joint that a 27-inch panel never does, so the tilt tension and the head assembly are doing more work here. Fully adjustable covers height, tilt, swivel, and rotation, and the arm range starts down at 17 inches, so it will also handle a smaller secondary screen.
Flaws but not dealbreakers: The listing title states the screen range but not the weight rating, so open the listing and match your panel's weight against it before you commit. A 34-inch ultrawide is a long lever, and weight is what the gas spring actually carries.
Who it is for: ultrawide owners, or anyone running a 27-inch or larger panel close to the top of a budget arm's weight range.
Measure the desk before you spend a dollar
This is the step everyone skips, and it is the step that causes returns. Five minutes with a tape measure:
- Desk thickness at the edge. Measure at the exact spot the clamp will sit, not in the middle of the desk. A desk that is 1.5 inches thick in the center can be thinner at a chamfered edge.
- Clear lip below the edge. A clamp needs a flat underside to grab. A drawer housing, a metal brace, or a cable tray within two inches of the edge can block it.
- Grommet hole diameter. If you are going the grommet route, measure the existing hole. If you are drilling, pick a spot where the bit will not hit a drawer slide or a support beam underneath.
- Monitor weight without the stand. Spec sheets list weight with the stand included. Subtract it, or weigh the panel on a kitchen scale.
- VESA pattern. Almost everything modern is 100x100mm, but small panels use 75x75mm, and some monitors use a recessed pattern that needs standoffs.
The install, step by step
Step one: lay the monitor face down on a towel. Take the stand off first. Keep the four VESA screws, because they are usually the right thread for the arm's plate, and losing them is how a 20 minute job becomes a 40 minute job.
Step two: bolt the VESA plate to the back of the monitor. Snug, not gorilla tight. If the pattern is recessed, use the spacers that came with the arm so the plate sits flat and does not flex the housing.
Step three: mount the base to the desk before the arm goes on. Clamp or grommet, then tighten and push on it hard with your palm. If the base shifts now, it will shift a lot more with 15 pounds of monitor on the end of a lever.
Step four: set the gas spring tension before you load the arm. Most arms want the head near the top of its travel for this adjustment. Get it close, because the final tuning happens with the monitor on.
Step five: hang the monitor. Slide the VESA plate onto the head and lock it. Anything 27 inches or larger is a two-person job, and the second person does not need to be strong, just patient.
Step six: set tilt tension with your bare hands. This is the setting that separates a usable arm from a frustrating one. Adjust it so the panel holds its angle with a light push but still moves when you want it to.
Step seven: route the cables. Power and video go through the channels, with a little slack at the head so nothing is pulling when the arm moves. A floating monitor with dangling cables looks broken, and it also loads the joint.
Step eight: run the wobble test. Push the monitor to full extension, then tap the desk with two fingers and watch the screen.
Step nine: level the panel and lock the joints. Bubble level on the top bezel, then snug the rotation lock so the screen does not drift when you bump the desk.
The wobble test, and what it actually tells you
The wobble test is diagnostic, not pass or fail. Tap the desk and watch the screen. If the screen moves with the desk, the desk is flexing and no arm on the market fixes that. A plywood backer or a wall mount does. If the screen moves while the desk stays still, the movement is coming from the arm's joints or the base.
At full extension, a small amount of settle is normal on any arm. What you are looking for is drift: does the panel end up lower at the end of the day than it started? That is the gas spring losing an argument with gravity.
Tilt tension is the setting nobody adjusts
Here is the pattern I see in almost every home office I walk into. The arm was installed, the tilt was set to whatever it was set to at the factory, and it has not been touched since. If the tilt is too loose, the panel slowly nods forward all day. If it is too tight, changing the angle feels like a fight and you stop doing it.
Set it once, properly, then check it again at day 30. If your arm needs a hex key to change tilt, that is a design problem, not a you problem. Arms that adjust by hand get adjusted.
Cable management in ten minutes
Route the video cable and the power cable together through the arm channels. Leave a service loop of a few inches at the head so the connectors are never under tension when the arm swings. Clip the slack to the underside of the arm, not to the desk, because the arm moves and the desk does not.
At the base, run both cables down and back, and secure them where they disappear behind the desk. That single move is the difference between a floating monitor and a floating monitor with a black vine hanging off it.
When your arm sags, do these four things in order
- Re-tension the gas spring. Most arms have an adjustment at the joint. Small turns, then test after each one.
- Re-torque the base. Clamps relax over time, especially on laminate desks that compress slightly under load.
- Check the VESA screws. A plate that has shifted a millimeter will make the whole head look crooked.
- Check your monitor weight against the rating. If you are at or above the ceiling, no adjustment will hold, and the arm is doing exactly what it was rated to do.
What this actually costs
Both listings show "Check current Amazon price" on Amazon, and I would rather you look at the live number than read a stale one here. What I can tell you is how to think about the spend: a monitor arm is furniture, not a gadget. The arm you buy twice because the first one sagged in month four costs more than the arm you bought once. Factor in the desk you already own, because a drill bit for a grommet hole is cheaper than a new desktop.
The cost per day math works the same way it does for a mattress. Divide the price by the number of days you plan to keep it. Most people keep a desk setup for five years or more, which flattens almost any arm into pennies.
Frequently asked questions
Will a single monitor arm work on a glass desk? Usually not with a clamp. Glass does not like point loads, and a clamp concentrates force on one spot. Use a grommet only if the desk was manufactured with one, or use a freestanding mount instead.
Can I put a 34-inch ultrawide on a budget arm? Check the stated screen range and the weight rating together, and leave headroom on the weight. The Suptek above claims coverage up to 34 and 35 inch screens, so start there and verify the weight against your panel's spec sheet.
Do I need to drill for a grommet mount? Only if the clamp will not fit. Most desks with a flat edge and a clear lip work fine with a clamp, and a clamp is reversible.
The bottom line
Set up order beats hardware every time. Measure the desk, weigh the monitor, confirm the VESA pattern, mount the base, hang the screen, tune the gas spring, tune the tilt, route the cables, then run the wobble test. Do that and either arm above will hold a screen exactly where you put it.
Skip the measuring and you will be back here in three months, reading about sag, with an arm you have already tightened twice. Five minutes with a tape measure is the whole job.